In order for wallpaper sticking to be more practical, it is necessary to prepare the surface of the walls, for this they should be:
- cleared of old wallpaper
- putty
- primed.
If everyone is sure of the need for the first two stages, then some people may neglect such an important process as priming.
- to create a dust-free surface that has maximum
- bonding ability
- prevents the spread of mold or mildew,
- filling microcracks and micropores on the surface of the walls, forming a monolithic film,
- improves the bonding of wallpaper to the surface of the walls.
What is needed for wallpaper
Priming allows you to prepare the walls before gluing the wallpaper, creating a dense layer (film), which leads to uniform application of wallpaper glue and subsequently save the cost of wallpaper glue. The glue applied to the primer allows you to easily adjust the gluing of the wallpaper panel.
How to choose
 Construction stores offer a wide range of primers, so you should carefully approach this issue. The choice of primer depends on:
- type of wall surface material (wood, putty, concrete, metal, etc.),
- wallpaper material
- conditions in which this room will be operated, etc.
Water-based acrylic and latex primers are not suitable for priming wooden walls, since moisture will lead to unnecessary swelling of the wood. Therefore, for the treatment of wood walls, it is recommended to use an alkyd primer. However, if it is necessary to primer a concrete wall, then an alkyd primer will not work, since increased adsorption of concrete will lead to excessive consumption of this type of primer. To process such a surface, a water-based acrylic primer is suitable.
Types of primers: which one to choose for wallpaper
Before choosing a primer, you must remember that the correct choice depends on the material of the wall surface (wood, concrete, putty, metal, etc.), the type of wallpaper (non-woven, vinyl, paper or washable) and other factors related to the operating conditions of the room (temperature, humidity, light).
Do I need to process the walls under non-woven wallpaper
 Decorating the walls with non-woven wallpaper gives the room a special grace of execution. The priming of the walls will facilitate the sticker process itself, neutralize and prevent the appearance of mold and fungus, as well as prevent the appearance of yellowness on the wallpaper.
For priming walls before gluing non-woven wallpaper, the following types of materials are used:
- Acrylic primer. The most common and inexpensive material. Method of preparation: dilute the soil with water. After application, it dries quickly, about 2-3 hours at an average room temperature. In the case of a non-uniform wall color, there are varieties of primers with a color scheme that will even out the tone.
- Non-woven alkyd primer. Dilution requires a specific solvent. This type is intended for priming walls made of wood material: chipboard, fiberboard, SIP panels, plywood, wood board, etc. This material covers the work surface with a waterproof coating.
Latex primer is used for all types of coatings and materials of which the walls are made. In addition, this primer is easy to apply and use.
Specialists recommend using wallpaper glue for priming. Method of preparation: dilute the dry adhesive mixture with warm water twice as much. Such material is applied exclusively with a thick pile roller. It is enough to cover the surface with two layers of material.
It is recommended that when choosing a primer for non-woven wallpaper, it is prudent not to take it based on PVA, since this type of material will lead to premature yellowing of the wallpaper.
Which is better for non-woven vinyl wallpaper?
 In the case of vinyl wallpaper, it should be remembered that this type of decor is made of synthetic PVC (decorative layer), and, as a result, this will cause moisture resistance.
For vinyl wallpaper suitable: acrylic, alkyd and latex primer. The choice of soil depends on the material of the wall surface on which the sticker will be made.
Acrylic and latex primers are suitable for plastered and putty walls, because by their characteristics they can penetrate the top layer, sealing microcracks and pores.
If applying a water-based primer to walls can lead to deformation and corrosion of the material, it is recommended to use an alkyd and glyphthal primer.
Alkyd primer is intended for the treatment of walls made of wood-based materials. In this case, the solvent will prevent the swelling of the wood from moisture.
Glifthal primer is a suspension of pigments based on acrylic varnish. This variety is ideal for wooden walls and will increase surface adhesion.
Under the paper wallpaper
 Paper wallpapers are the most economical option for wall decor. They are malleable to the action of moisture of the glue, in addition, if mistakes are made during the preparation of the walls and the sticker process, they can bubble, delaminate and break. To prevent errors, it is necessary to take into account all these nuances.
First of all, it is necessary to take into account the material of the walls, as is the case with non-woven and vinyl wallpapers. However, experts recommend using the option of priming with wallpaper glue, since this material during the sticker process will provide the opportunity for accurate correction with air grooves or the occurrence of uneven joints.
What to process for washing wallpaper: how to prime
Washing wallpapers are used in rooms where it is assumed that they need to remove dirt or moisture from them, such as rooms such as a bathtub, kitchen or hallway. In structure, they are similar to vinyl wallpaper. Due to the similarity of these types of finishing materials, the choice of primer is determined by the same principle. It should be remembered that the gluing of wallpaper with a polymer synthetic coating is done after the primer has completely dried.
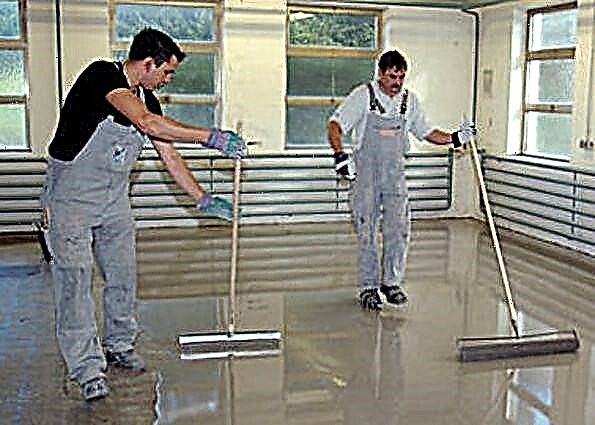
Do it yourself primer
 Do-it-yourself repair is an economical enterprise. The primer of the walls in a set of actions is similar to the process of painting the walls with a roller. For priming the walls you need: primer, high-pile roller, wringer tray, brush.
When applying a primer to walls, one must not forget about personal safety measures. First of all, you need to take care of protecting your eyes and hands, for which you need to use special glasses and gloves.
How to apply
Initially, the primer is prepared according to the recommendations of the manufacturer. After dilution, the first portion is poured into a spin tray. Then the roller is moistened in the soil, squeezing it carefully, since the primer itself is very liquid and supple, which is why it is easily sprayed upon application.
Apply to the wall with smooth movements from the bottom up, it is advisable to go a strip from floor to ceiling. In many cases, the problem arises that during the process it is difficult to determine the places where the soil has already been applied.
Many wizards recommend two control methods:
- light is to apply a primer to the lumen in relation to the window, that is, it is necessary to start priming from window to door. Then, at any difficult moment, looking along the wall in the direction of the window, it is easy to see wet places,
- color, initially during dilution of the primer add color to the tone of the wallpaper.
How many times do you need to apply
 In the process of priming the wall, the number of coating layers depends on the type of primer chosen, the material of the wallpaper, as well as the quality and material of the walls.
To achieve a good result, it is recommended to coat with a primer:
- acrylic - at least two times,
- alkyd - twice
- latex - two layers are enough,
- glyptal - one layer is applied,
- primed with glue once.
The better to smear
 For the convenience of applying an acrylic or latex primer to the wall, it is recommended to use a wide roller with a thick pile.
Alkyd or glyphthal primers on a vertical surface must be applied with a short pile roller.
All soil mixes are applied from bottom to top to prevent runoff. For applying various types of soil in hard-to-reach places, for example, the corner of two walls, or in delicate places requiring caution - the edge of the wall near the baguettes, it is recommended to use paint brushes.
Do you need to prime before removing new wallpaper after removing old
Painters recommend priming the walls before pasting new wallpapers. In particular, if the walls were not previously primed, this procedure will prepare them. Secondly, priming the old primer layer will restore its maximum adhesion properties, in connection with which gluing will take place without negative manifestations.
How much can I glue
Depending on the type of soil chosen, the wallpaper sticker can be started almost immediately after the walls have dried. If the primer and wallpaper glue are water-based, sticker on paper and non-woven wallpaper is allowed, without waiting for the final drying of the working surface. If they are treated with alkyd or glyptal material, then gluing should only begin after the final drying of the soil.
Is it possible to replace with wallpaper glue
 Professional finishers, as one of the options for preparing walls, offer priming with wallpaper glue, which will allow:
- remove and clean the surface of the remaining building dust,
- fill microcracks and pores in the wall covering,
- increase surface adhesion.
When priming with wallpaper glue, it is recommended to take the same brand of glue, which will stick the entire array of wallpaper. The preparation of the glue mixture for priming is simple: it is necessary to dilute the glue in warm water, taken in double volume from the set.
Primer Benefits
Primed surfaces have several advantages:
- fungal protection
- uniform and economical distribution of wallpaper glue,
- removing building dust and filling microcracks and pores, creating a protective film,
- saving wallpaper glue and uniformity of its application.
Even if priming surfaces can become an additional expense in the repair estimate, and also takes time, it still brings dividends in the form of additional protection of the walls of the apartment, and also simplifies the process of sticker wallpaper.
Link to the article

Link to the article
When repairing an apartment, we often make a choice in favor of non-woven wallpaper. They are beautiful, durable and even able to hide small wall errors. The gluing process is so simple that sometimes we do not particularly care about the preliminary preparation of the base. But this business has its own nuances, which we will discuss in this article.
Why primed walls

Like any finishing material, the wallpaper should hold firmly and not turn yellow over time. To do this, use acrylic and alkyd compounds, latex compositions and even a solution of wallpaper glue. If the walls of drywall are not pre-treated with soil, then subsequently the wallpaper will have to be removed together with putty or a protective layer of drywall panels. Therefore, the preparation of the walls must be done.
At normal room temperature, the primer dries quickly. After 2-3 hours after application, you can begin to wallpapering. All work can be done in one day. Sometimes it becomes necessary to apply a second primer layer, and then the operating time increases. Most often, the second layer is needed for porous and loose surfaces.
Apply acrylic primer

This is the most popular composition, and you can find it in any hardware store. Water acrylates are sold in packs of different volumes and can be either in finished form or in the form of a concentrate, which is sufficient to dilute with ordinary water immediately before starting work.
Acrylate primers have virtually no odor, and you can work without the use of protective equipment. If liquid has got on the skin, it is enough to wash it off with a stream of water from the tap. Acrylates well clog all small pores on the surface of the wall and significantly reduce its absorption. The ability to stick, the so-called adhesion, improves. And glue consumption is sometimes reduced to 50%.
The soil penetrates and strengthens
When choosing an acrylate primer, you can see the designations: firming, deep penetration, universal, adhesive, with antiseptic additives, etc. From such a variety can be confused. But in fact, everything is quite simple: the names speak for themselves. Moreover, manufacturers add antiseptics to all soils so that the walls under the wallpaper are not subjected to raids by molds.

It is necessary to pay attention to the composition called “Adhesive”. It has a special mission: it does not penetrate deeply, but forms a strong layer on the surface that adheres well to the subsequent coating. It is used for priming weakly absorbing or even completely non-absorbing surfaces, for example, dense concrete, a section painted with oil paints. A good solution for such dubious areas would be to use an adhesive primer with quartz fine sand. Mix thoroughly, apply on a glossy surface and wait until it dries. An even rough layer appears, similar in appearance to sandpaper. Any wallpaper will firmly adhere to such a layer. Such a quartz mixture is especially suitable for heavy embossed vinyl wallpaper on a non-woven fabric.
But the walls are different

Imagine that you bought non-woven wallpaper for painting in delicate pastel colors. It will require not only the perfect smoothness of the walls, but also the uniformity of the color of the base, since dark spots will be visible under a translucent layer of non-woven. The wall should be uniformly light throughout its area, and this can be achieved by applying a paint primer. In order not to waste time looking for the desired composition, you can add a little white water paint to the universal primer, and the problem of leveling the tone of the base will be solved.
When we work with alkyds

Difficult circumstances of life or the free flight of designer imagination can lead you to the need for gluing non-woven wallpaper directly on plywood, particleboard, OSB and other wooden surfaces. And wood is a whimsical and nervous material that reacts to moisture. So, it is necessary to prime with compositions based on organic solvents that do not contain water. These are primers based on alkyd resins.
The best primer is white, and, of course, this is not the right layer for plasters and putty surfaces.
Primer against moisture
Vinyl wallpaper on a non-woven fabric works well in the kitchen, in the bathroom and even on closed unheated loggias. Vinyl on non-woven fabrics can easily cope with increased humidity, but it needs to be helped by priming the surface of the walls with moisture-resistant compounds. This is an aqueous composition of acrylates, which forms a film, when dried, much denser than that of conventional primers. A wall treated with such a composition retains the ability to “breathe” by letting in air, but a rather reliable barrier is created for condensed moisture.The non-woven fabric in such an environment behaves stably, without deforming and not peeling off the walls.
Moisture-resistant primers, most manufacturers produce in concentrated form. They must be diluted in strict accordance with the recommendations. Sometimes it may be tempting to use the formula undiluted, so to speak, “for strength”. But such experiments end with the opposite result: this type of primer, and when diluted, creates a fairly dense film, and when dried, the concentrate generally becomes glossy. It is already difficult to adhere to such a surface.
Is it possible to prime with glue?

For heavy vinyl wallpapers, this method of priming is not very suitable, but for non-woven fabric with a thin layer or without it at all, it is quite acceptable. True, glue will be required one and a half times more than usual. For the primer composition, we dilute the adhesive in warm water according to the usual scheme, but we pour the water itself twice more. Pour the dry mixture in a thin stream with continuous stirring.
Leave the resulting composition alone for 10 minutes, then mix thoroughly again. We apply liquid glue to the walls with a roller, distributing on the surface with a thin layer without the formation of smudges. It is important to be patient and start gluing the wallpaper only after the primer has completely dried. This usually takes from 8 to 12 hours at normal room temperature. With all the simplicity of this method, you need to remember that it is suitable only for smooth and strong walls.
After completing the priming work, you need to once again check the quality of their implementation. To do this, just hold it on the surface with your palm. The absence of grains of sand or traces of putty will be an accurate sign that the work has been completed successfully, and you can confidently proceed to gluing non-woven wallpaper.
Do I need to prime the wall before wallpapering
Thousands of skeptics will object: “Fathers and grandfathers did not know what a primer is, and wallpapers hung on the walls for decades.” Partly they are right. Indeed, several decades ago, if priming of the walls was carried out, they did it either with very liquid home-made glue, or used diluted PVA glue.
However, this statement ignores the fact that at that time the wallpaper was paper, and therefore light. Therefore, glue based on starch or flour easily held them on the wall for a long time. In addition, the types of walls did not have a variety: brick, wooden, which were necessarily plastered with cement-sand mortar, and concrete. Their adhesion to the adhesive was good.
With the advent of new types of wallpaper (heavy, with different bases) and types of wall material (aerated concrete, gas silicate, etc.), as well as the beginning of the use of dry gypsum plaster (drywall), gypsum fiber (gypsum sheets), OSB (oriented chipboard) and plywood to achieve good adhesion of the walls with wallpaper with adhesive has become very difficult. The primer for the walls for the wallpaper was able to solve the problem.
Primer (another name - "primer") is a special liquid composition that is applied to the surface to be glued to create a reliable adhesion between the wall and wallpaper glue. Do walls always need to be primed before wallpapering? Almost always. There are three exceptions when this type of work is impractical:
- temporary repair, for four to five years,
- bought light paper wallpapers,
- pasting is done in the utility room.
In other situations, applying a primer allows you to:
- improve adhesion between the wall and the adhesive mass,
- to tie dust microparticles that could not be removed during the preparation of the wall for wallpapering,
- increase the resistance of the wall surface to mechanical damage and protect it from microcracks during operation,
- protect the walls from damage during the subsequent removal of old wallpaper (especially true for drywall),
- prevent the appearance of fungus and mold on the glue thanks to the drugs added to the solution,
- hide darker spots on the surface of the wall (a special pigment primer is used that levels out greater contrast in the color scheme), which are visible through light or thin trellises,
- reduce the consumption of wallpaper glue due to:
- filling with primer composition of microcracks, pores and small irregularities (having a high dispersion of particles, primer solutions penetrate deep into the wall material and stop pores and cracks into which glue would fall),
- creating a water-repellent layer on the wall, as a result of which concrete, plaster, putty, drywall do not draw moisture from the adhesive mass: as a result, premature drying of the adhesive is prevented and, therefore, it is not applied again.
Types of primers and their characteristics
The choice of primer for wallpaper is completely determined by the type of material on the surface of which it is planned to apply soil. Unfortunately, in various articles on this subject, the authors of popular educational works mislead buyers, claiming that there is a special primer for non-woven, vinyl, paper wallpapers.
Why is there no primer for a particular type of wallpaper? Let's get it right. For each type of wall material, a special component must be present in the wallpaper adhesive, which is responsible for the adhesion of the adhesive mass with this surface. Such surfaces can be counted about 12 species. For convenience, we round up to 10.
Then the manufacturer of glue, for example, for paper wallpaper is obliged to produce 10 of its varieties (for each surface). The actual wallpaper with a different base is also about 10. As a result, it turns out that at least 100 types of adhesive mass should be present on the building materials market. It is irrational neither for manufacturers, nor for sellers, nor for buyers.
With the advent of a primer acting as an intermediary between the wall and the glue, it is necessary to produce 10 types of primer, for each type of surface and 10 types of adhesive, under the corresponding base of wallpaper.
The whole variety of primers on the construction market can be sorted by release form, type of solvent, purpose, type of soil. Such knowledge will facilitate the search for the necessary product.
According to the form of release. On sale you can meet:
- ready-to-use liquid solution
- concentrate to be diluted
- dry mixes requiring preparation.
By type of solvent. In production as a solvent are used:
- water (aqueous emulsion primer),
- organic solvents (acetone, butyl alcohol, isopropanol, white spirit, etc.).
By appointment. Depending on the functions performed, the primer is divided into:
- penetrating (for concrete, brick, stone),
- reinforcing (drywall, GVL, all types of cellular concrete, gas silicate, etc.),
- adhesive (for cases when it is planned to stick wallpaper on glass, tile, plastic).
By type of soil. The primer may be acrylic, alkyd and mineral.
Acrylic primer (emulsion). This is the most versatile type of primer. Acrylic can be used on almost all types of wall material: concrete, brick, wood, plywood, cement-based plaster, etc. As intended, deep penetration is issued, impregnating (hardening) and adhesive. Easily soluble in water, does not smell, dries quickly.
Available in the form of: dry mix, concentrate, ready-made solution and soil-mixture in a spray can. When special substances are added, the primer acquires antiseptic properties (used in the kitchen) or becomes pigmented (hides bright color spots). The most popular brands are: “Alpina”, “Ceresit”, “Composite”, “Knauf”, “Perfect”, “Prospectors”.

Alkyd primer. This type of soil is based on alkyd resins diluted with organic solvents, mainly white spirit. The application is almost universal - all types of wall material with the exception of drywall, gypsum plaster, putties and plasters based on cement and gypsum (alkides destroy them).
Has an unpleasant pungent odor that occurs due to volatile substances released within 15-18 hours. After prolonged ventilation, the air is completely cleaned. It can dry up to 16 hours. Due to the presence of polymers in the composition, it forms a film on the wall surface that can withstand a large temperature difference (from -40 to +60 ° C) and mechanical stress.

The presence of a water-repellent film allows the use of a primer in the bathroom and in the kitchen. Available only in ready-to-use form. If necessary, dilute for a more liquid consistency, white spirit is used, regardless of which solvent is used in the primer base. The disadvantages include the toxicity of the composition, which disappears after the polymerization of the film.
It has varieties: glyptal, perchlorovinyl, polystyrene and polyvinyl acetate primer. It is produced by well-known companies: Kompozit, Aura, Tikkurila.
Mineral Primer The mineral-based primer includes cement, gypsum and lime, which bind the base of the wall of concrete, expanded clay concrete, brick (gas-silicate brick and blocks), as well as plaster and putty with wallpaper glue. It is odorless, dries quickly.
Produced by the company "Remmers", "Ceresit", "Caparol" and others. It is very difficult to find mineral and alkyd primers on sale. The reason is that acrylic primers cover all the problems that arise before wallpapering, but at the same time they are much cheaper.

Primer selection by wall surface type
In terms of popularity, depending on the type of wall, the following primers are leading among buyers: Ceresit and Knauf. Their comparative characteristics are given in the table (prices taken in St. Petersburg in the middle of summer 2018).
| Primer Name | Packing | View primer | Surface type | Consumption on 1m2 | Price from, rub. |
|---|---|---|---|---|---|
| Ceresit CT 17 | 10 l | acrylic | concrete, brick, drywall, wood, plaster and putty, gas silicate blocks | 0.05-0.25 L | 510 |
| Ceresit CT 19 | 15 kg | acrylic adhesive | concrete walls, glass, tile, plastic | 0.3-0.75 kg | 1165 |
| Knauf "Tiefengrund" | 10 kg | alkyd | GKL, GVL, gypsum putties and plasters | 100 gr | 690 |
| Knauf Grundirmittel | 15 kg | alkyd | gas and foam concrete, silicate brick | 0.2-0.3 L | 3000 |
| "Optimist" | 10 l | acrylic | tree | 0.1 L | 547 |
To summarize: primer for wallpaper, which one to choose? This is an acrylic primer: versatile, easy to apply, odorless and non-toxic.
If the choice does not suit you or you want to save, then you can prepare your own soil yourself.
- boiling water - 7 l
- drying oil - 0.1 kg
- Laundry soap - 0.15 kg
- lime (slaked) - 2 kg,
- bucket - 2 pcs.,
- fine sieve - 1 pc.,
- grater - 1 pc.
Soap is rubbed on a fine grater and diluted in 3 l of boiling water. When it is completely dispersed, drying oil flows in and the composition is stirred. In another bucket, 4 liters of boiled water are poured and lime is poured.
The solution is also mixed. Water with soap and drying oil is poured into the milk of lime and mixed. A slightly cooled home-made primer is filtered through a fine sieve. The cooled mixture can be used for its intended purpose.
Expense calculation
To determine the amount of primer needed, you need to calculate the area of the walls minus the openings of the doors and windows. Multiply the resulting amount by 2 (the number of passes) and multiply again by a factor of 1.1 (unforeseen losses of 10% are laid down).
Then, using the table below, calculate (roughly) the number of cans or primer bags. A more accurate figure can be obtained directly when buying a primer - the packaging shows the consumption in g / m 2 or ml / m 2.
| Type of primer | Type of wall | Consumption in g / m2 |
|---|---|---|
| Diluted acrylic | wood, iron | 40 |
| Undiluted acrylic | plywood, particleboard, OSB, sawn wood | 140 |
| Alkyd | brick, concrete | 135-150 |
| Acrylic | for all types of material except wood | 100 |
| Universal | for all types of walls | 65-100 |
Materials and Tools
Walls can be primed without problems when available:
- primer suitable for the type of wall
- basin (bucket) for stirring the primer,
- ditch for the mixture,
- ladder,
- fur roller with a long handle,
- a brush for processing places inaccessible to the roller.
Preparatory work
Processing the surface of the walls with soil is possible only after they are prepared for wallpapering. At the same time, preparatory work in a new building and an inhabited apartment can differ significantly.
In the new house, the walls are cleaned of building dust and, if necessary, are leveled with plaster or gypsum plaster. If repairs are being made to an already populated living area, it will take significantly more time to bring the walls into working condition. It is necessary:
- remove the old finish (paint or wallpaper),
- check the plaster, if it was applied earlier, for the absence of places behind the wall and, if necessary, completely remove it,
- inspect the walls for microcracks and repair them,
- plaster the surface of the walls.
Detailed instructions under this paragraph are given in the material: "How to prepare the walls for wallpapering."
Preparation of a primer mix
Depending on the form in which the primer is purchased, the technology for preparing the mixture depends.
- The primer in the finished form does not require additional manipulations to bring it into working condition (just shake). However, experienced craftsmen when working with concrete or reinforced concrete walls for the first layer are primed with water - acrylic compounds, white spirit alkyds.
- Concentrates are diluted according to the recommendations printed on the package.
- To prepare a primer solution from dry mixes, you will need a mixer, a bucket and a solvent (water or white spirit). The dry mixture is poured into the poured water in the proportion specified in the instructions, and stirred with any object (trowel, stick, etc.) until lumps of the dry mixture disappear from the surface of the water. After that, the mixer mixes the solution until a homogeneous mass is formed.

Primer walls
The priming stage consists of a series of sequential work.
- A polyethylene film should be spread along the wall to protect the floor from splashes that form when using both the roller and the brush.
- The primer is poured into the cuvette to the level of the ribbed site.
- A roller is lowered into the primer solution and wetted around the entire circumference.
- On the ribbed surface of the bath, the roller is wrung out - otherwise a lot of the mixture will be on the floor.

- Priming starts from the bottom and goes up - in this case, the primer drops flow down the wall, rather than flying to the floor.
- It is necessary to roll out the soil with a thin film, avoiding traces of drips. It is necessary to go through the leaked solution again with a roller.
- In corners and inaccessible places, the wall is primed with a paint brush.
- The second layer is applied after the first has dried.
Finishing work is started after the primer dries.

When can I start gluing wallpaper?
After applying several coats of primer, many inexperienced finishers immediately start gluing the wallpaper and, therefore, make a big mistake. Then a logical question arises: how long can I glue the wallpaper after the primer? Only after the primer has completely dried.
In aqueous solutions, this time can be from 2 to 15 hours, in alkyd primers - up to 35 hours. The estimated drying time of the solution is always indicated on the packaging. However, under the influence of various factors, it can fluctuate significantly.
In practice, experts check the readiness of the wall for pasting a drop of water. If it spreads like a stain - you need to wait further. On a dry surface, it will slide down.
In conclusion, some tips
If the wallpaper is glued for a long time, you need to adhere to the following tips:
- Do not use wallpaper glue and PVA glue, finely dispersed and water-based paints for priming.
- The primer should dry well. It’s better to wait an extra day and only then paste the wallpaper.
- Do not spare money and apply a primer in at least 2 layers, even if the package indicates that one pass is enough. Thus, the places missed during the first priming are processed.
- When buying a primer, correctly determine the type of wall material. It may be different. For example, cement plaster and gypsum plaster.
- Carefully study the composition of the soil and recommendations for application. Under the guise of a good primer, PVA glue may turn out to be, or, like Ceresit CT 19, the primer should be applied only with a brush.
- The primer for liquid wallpaper, if glue is not used, is applied at least 4 times.
- It is conservative to choose a primer brand - buy products from familiar brands.
Choosing a primer for walls
Work begins with a choice of primer. The question arises: how to prime the walls in the apartment before wallpapering? Previously, craftsmen could process the walls before gluing the wallpaper with ordinary PVA glue or wallpaper glue diluted in water. And until now, unscrupulous manufacturers under the guise of a primer in solid containers sell such a product. This option of wall treatment is acceptable, but in this case, you can dilute the glue yourself, and not buy a product that is definitely not worth the money for which it is offered.
If you want to use a specialized primer, you should purchase certified goods in a container where the name of the manufacturer, composition, characteristics, and shelf life are clearly and clearly indicated on the label. It is better to spend a little more than to get a poorly finished coating.

The following types of adhesive primers should be distinguished:
The acrylic primer family is designed for most types of surfaces, including concrete, brick, wood, plaster and putty. They dry quickly, do not have a pungent odor, are better suited for drywall than others. Depending on the material of the wall surface, you can choose:
[smartcontrol_youtube_shortcode key = "choice of primer for walls" cnt = "4 ″ col =" 2 ″ shls = "true"]
- universal primer
- ordinary
- deep penetration composition.
Alkyd primers are better placed on wooden surfaces, glyptal primers are designed for metal, and mineral primers containing cement and lime are optimally suited for concrete and foam concrete.
Also, for wall priming, wallpaper glue, mixed in a certain proportion, is used, but here one should strictly adhere to the recommended instructions indicated on the package and take only products of well-known manufacturers.

Tip. Choose a primer that is suitable for the type of base and type of wallpaper glue applied to the primed surface. The ideal option would be to use the materials of one manufacturer or at least clearly follow its recommendations.
Getting to work
At hand should be such tools:
- Bucket.
- Paint bath.
- Wide roller with a long handle.
- Brush.
Pour the primer into the bucket and mix thoroughly. If the mixture is concentrated, dilute it with water to the desired condition, following the instructions on the label, taking into account your type of wall. The first layer (and there will be at least two) is diluted thinner, so that the solution is deeper absorbed into the wall and firmly bound the treated surface.

Now you can start priming the walls before wallpapering.
- Pour the resulting solution into the bath, take the roller and carefully, without spraying, dip it into the dishes, then slightly squeeze the pile of the roller on the corrugated edge, so the primer is used more economically.
- We start processing from the bottom, leaving about 5 cm to the edge of the floor so that accidental dust does not fall on the pile of the roller: it will significantly degrade the quality of the coating. Then with a brush it will be possible to accurately process this part.
- How to primer the walls under the wallpaper so that there are no gaps? It’s more convenient to start from the corner, it’s easier to control the density of the application. Without excessive efforts pushing on the roller, we go from the bottom up. So primer drops do not flow down the wall to the floor. Several times we carry out a roller from the bottom to the ceiling, making sure that the surface is well wetted and the primer layer lies flat.
- So, smear after smear, we pass the entire surface, marking the surface to be treated with a noticeable darkening from moisture. This will correctly indicate a properly primed wall.
- When the main space is treated with a roller, inaccessible places remain, such as the corners between the wall and the floor, the wall and the ceiling, various protrusions, areas near sockets and switches. Here, gently apply the primer with a brush, observing safety precautions.
- Let the wall dry for 2-3 hours.
In more detail, all the stages of the work you can see on the video.
[smartcontrol_youtube_shortcode key = "how to properly wall the walls" cnt = "4 ″ col =" 2 ″ shls = "true"]
Note: another way of applying a primer is to use a spray gun. Pluses: simplicity of execution and material saving. The solution does not spread, it is applied dosed. Cons: excessive spraying over the entire area of the walls. The smallest suspension will be in the air for a long time throughout the apartment and you will have to carefully ventilate the room several times.

The final stage of the primer walls
The second coat of primer is applied with a more concentrated and thicker solution. The whole process is carried out in the same sequence. Since the base has already been strengthened and waterproofed with the first layer, for the second one, instead of the primer, you can safely use wallpaper glue in a more liquid state than for gluing.
At the end of the primer, when the wall dries well, you can begin to paste over it with new beautiful wallpaper.

Little trick
To make sure the quality of the primer applied, professionals drip water onto the wall: if a drop flows down the wall rather than spreading out with a stain, then everything was done correctly.
You can understand all the subtleties of the process by watching a video on how to properly prime the walls before wallpapering.
It is important to remember that it is necessary to apply a primer before each stage of finishing work, whether it is applying plaster or wallpapering.
Why primed walls before wallpapering
Primed walls or not, everyone decides for himself. Experts strongly advise that the surface be primed before gluing the wallpaper, this step allows you to achieve a better and more durable result.
The primer provides the following benefits:
- The surface becomes perfectly flat.
- Moisture will not be absorbed into the walls.
- Provides good adhesion of the adhesive to the surface.
- The base becomes more durable and reliable.
- Provides protection against mold and mildew.
- It allows you to reliably hide dark spots on the surface of the walls, which is very important in the case when thin and light wallpapers will be used for gluing. If this is not done, then spots can appear through thin paper, which will ruin the coating.
There are many more advantages that favor the use of primers. On sale, they are represented by different species, each of which differs in its features and compositions.
Before buying a primer, you need to carefully read the instructions, it will be indicated there for which surfaces it is intended.
This is very important, because if you glue the wallpaper on a concrete surface, and for the primer you choose, for example, a glyphthalic composition, then processing will not provide good results, therefore it is intended for processing only metal surfaces.
That is why you should always read the instructions.
What types of primers exist
All types of primer mixtures presented, as we have said above, differ in their properties, composition and, based on this, are divided into the following groups:
- Glifthal. This view is for metal surfaces. After processing, you can glue the wallpaper no less than twenty-four hours. Recommended for use in dry rooms.
- Acrylic based compounds. The primer can be used for the treatment of wooden, brick, concrete, wood fiber, stone, chipboard and drywall surfaces. Also, an acrylic primer is used before gluing the wallpaper on the walls over the putty under the lining. The mixture does not have a specific smell, so it can be used to treat walls in residential premises. At most, it takes thirty-five hours to dry completely.
- Alkyd based primer. This type is characterized by high anti-corrosion properties. Used for surface treatment of metal and wood. It is not recommended for use on gypsum and plastered surfaces.
- Perchlorovinyl compounds. They are used for metal and mineral surfaces. Indoor use not recommended. The polymerization time is small.
- Based on PVA (polyvinyl acetate). The composition is best used if the finishing material has the same composition. The time to complete drying is very short, about thirty minutes. Among all types, it is the quickest drying mixture.
- Polystyrene primers. They are used for wallpapering on plastered and wooden surfaces. However, due to the fact that the mixture contains organic solvents, they are not recommended for use in residential premises.
- Phenolic primers are suitable for the impregnation of metal and wooden surfaces.
How to apply a primer to a wall surface
The primer composition must be applied in compliance with the rules and technology, in this case, you can achieve a high-quality result. For wallpapering, a white primer mixture is most often used.
First prepare the surface. Old wallpaper, plaster, paint, nails are removed. As soon as the surface is cleaned, it must be puttied. After the putty dries, the surface is moistened with a special impregnating compound that will help remove dirt. This is important, because the primer should be applied only to a clean and dusty wall, this will provide high-quality adhesion.
Attention! Before priming the walls in wet rooms, carefully inspect the corners of the room, maybe there will be fungus or mold. They should be disposed of before the primer is applied.
How is the process of priming the surface for wallpapering, we will consider in more detail. First you need to decide on the type of primer composition, and there are enough options here. You can use the adhesive composition of PVA or glue for wallpaper, only more diluted. But it is best to use special primer mixes, they will provide good quality and easy to use.
Even if you decide to save money, you can buy a special primer, its cost is slightly higher than for PVA glue, but much cheaper than wallpaper adhesive, which is intended for priming surfaces. Priming work is performed in this way:
The primer must be diluted in water. You can learn about the proportions from the instructions. The composition mixes well until a homogeneous mass is formed, there should be no lumps in it. For stirring, it is better to use a drill with a special nozzle. If there is no such device, then this is done manually, it just takes more time.
Attention! When preparing the primer, you need to be careful, in some formulations there are substances that can cause an allergic reaction. Therefore, you should protect all exposed areas of the body and wear a respiratory mask. This is important, because the pairs of substances that you will inhale can negatively affect your health.
For applying a primer, it is better to use a wide brush. Apply the mixture in an even layer. Make sure that no tubercles remain. As soon as the first primer is applied to the surface of the wall, it is necessary to wait a while until it is completely dry and then apply a second coat. If the application instructions do not say that a second coat is required, it should be applied anyway, this is necessary so that the primer fits perfectly on the surface.
If the base for gluing wallpaper has perfect evenness, which does not happen so often, then the composition can be applied using a roller, this significantly speeds up the work. In addition, working with a roller is much more convenient than using a brush. An uneven surface can also be treated with a roller, but then all missing places must be well smeared with a brush.
That's all, the work on priming the walls is finished, as you see, there is nothing complicated here. Everyone will be able to perform them independently, for this you do not need to have certain skills, the main thing is to adhere to the rules for the preparation and application of compounds. Properly applied primer will ensure a smooth surface and reliable protection against mold and mildew.
When choosing a composition, be sure to read the instructions, because not every one of them can be suitable in your case. Also be careful about preparing the primer, strictly adhere to the proportions indicated in the instructions.