Before proceeding with active actions, I propose to study the final result of the work and its technical characteristics.
Most budget gazebos are built on the same principle, the cost of materials is also about the same, but still I would like to focus on this - it is important to understand what and what we are going to build from.
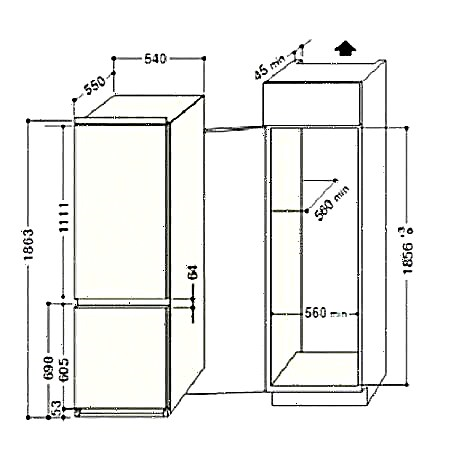
Technical characteristics of the finished gazebo
The photo is presented to the right of the specifications. When you click on a photo, it will open in a larger size.
- Material: Bar 100 to 100 mm,
- Dimensions: 3 by 3 meters
- Foundation: columnar (made of bricks),
- Roof: single slope
- Roof: euro slate (ondulin), but you can use a more budgetary option - corrugated board,
- Wall cladding: oriented strand board (OSB),
- Floor: board 40 to 100 mm "forty",
- Painting: antiseptic Senezh Ultra in 3 layers.
Materials for construction are the simplest and cheapest. Nevertheless, they are quite enough for a reliable and strong construction, which will stand far from one year and withstand more than one hundred rains.
Foundation
For such a structure, a columnar foundation was chosen. It consists of nine brick pillars, which are the basis for the entire arbor. The process of building the foundation is as follows:
- Digging holes 9 with a depth of 70 cm,
- The first 30 cm are covered with sand (ideally put a little gravel on the bottom) and tamped,
- The remaining 40 cm are covered with construction waste and poured with concrete,
- Two bricks (ideally burnt ceramic red) are laid on top of concrete,
- A layer of bitumen is applied over the bricks and, ideally, a sheet of roofing material is laid.
This foundation is extremely reliable for small buildings. Summer arbor is an ideal building under such a foundation. Therefore, it was he who was preferred during construction.
Arbor - a decorative building or a favorite place to relax?
A gazebo is a decorative building that has an attractive appearance and is intended for relaxation, solitude, reading books and socializing. It can serve as an additional room for the family. The gazebo gives a unique look to your garden and serves as one of your favorite pastimes. But it is necessary that the arbor corresponds to the style decision of the garden. If the gazebo is primarily used for decoration, then it can be located on a well-visible place in the garden. A suitable place, however, may be a corner in a remote part of the garden, from which you may have a charming view of the house and garden. Pergolas can be built from various materials and can correspond to different architectural styles.
As an architectural structure, the gazebo should meet the basic criteria: beauty, functionality, reliability. Before the construction of the gazebo, it is necessary to determine its purpose, whether it will be a place for receiving guests or a secluded corner near the reservoir. This is best done at the landscape design stage. The list of materials used for construction will depend on this.
Many arbors are constructed mainly of wood, but their frame can be made of brick or stone. The structure may be open blown or closed.
A gazebo made of metal or wrought iron can also look very attractive. It looks transparent and light and grows well with climbing plants. The metal can also be painted in different colors to get the desired effect.
A glass gazebo, usually based on metal and wood structures, decorated with vegetation, can also be attractive in its design.
Another type of open gazebo is a belvedere - a structure without walls, with support stands and a solid roof. The belvedere is usually built of wood; there are also structures made of aluminum and even plastic.
When designing a certain gazebo, we take into account external factors. If the gazebo has one or more closed walls, then they are located in such a way that the wind does not penetrate into the gazebo, and its internal space is hidden from prying eyes, but at the same time a pleasant view should be taken from the gazebo. We pay attention to reliability so that the foundation is strong enough. For large arbors, it is recommended to arrange a tape or columnar base of monolithic concrete. In each case, a specialist in the field of landscape architecture will help for individual solutions.
In our company YOU will be able to look and choose ready-made gazebos or order a draft of an individual solution.
Pergolas, tapestries, arches
Pergolas and trellises are architectural and construction elements that optically divide the garden into separate parts or, conversely, bind it into a single whole. As a rule, trellises and pergolas serve as a support for climbing plants and allow you to make additional vertical decoration even in the smallest garden.
Pergola (from Italian.pergola) is a covered gallery that covers the entire track. Currently, pergolas are widely used in park construction and in the construction of gardens. They consist of numerous arches connected to each other. This element in itself has a spectacular effect on the visitor to the garden, being used as an arch at the entrance, twined with roses, or as a fence of a garden path framed by climbing plants, or simply as a frame to create a visual effect. Pergolas often play the role of a green room in some remote corner of the garden, therefore, during the construction of pergolas, their architectural form is important, because the columns of pergolas may not be fully covered with plants.
Decide if you want the pergola to be a support for the plants. The stability of a pergola often depends on the number of plantings envisaged, and you should take into account both the visual effect and the physical mass of the pergola. Curly and creeping plants soften the appearance of the pergola, providing a certain degree of privacy, in the summer they create an attractive shadow, and in the winter months they skip shine. The style of the pergola must certainly be combined with the general style of the site and the main building. They are made of various materials - wood, plastic, metal, brick, stone. Ideally, the structure should be slightly larger in width than in height, a section in the form of a square is allowed. The distance between the vertical supports along the length of the structure should be one third greater than the width of the pergola. The shape of pergolas can be varied and allows imagination to unfold. Spherical, cubic, linear and rectangular - there is sure to be a pergola just for your site.
Arches, as a rule, serve to design transitions between different areas of the garden, the entrance to the garden, etc. Arches are flat-arch, gable, semicircular, lancet or Gothic. The arch can be placed at the beginning of the path or at the entrance to any zone of the garden, you can use the arch to arrange the entrance to the house. If you install an arch near the wall of the fence or at home, then a bench will fit perfectly into the niche formed. Like pergola, the arch is made of a variety of materials from plastic to stone, and is also usually covered with greenery. The solution is especially spectacular when the arch twisted with climbing roses forms a single ensemble with a terrace located directly at the house.
Trellis and trellis are mesh structures made of wood or a metal rod. Their supports can be made of wood, metal or made of brick. Rails are crossed at an angle of 60 degrees and get a pattern of rhombs. Decorative grilles are installed along paths and platforms, and also as a demarcation between separate sections (zones) of the garden, for screening any zones or objects, as well as for highlighting, emphasizing any plant. At the base of the gratings, climbing plants are planted, which, growing, densely braid the structure. This is an excellent protection against wind and sun. For landscaping the walls of buildings and high fences, it is advisable to use wooden lattices from thin battens. The cell module is determined based on the size of windows and doors located in the wall in order to maintain symmetry.
As the name implies, such a gazebo is different in that it is literally open to all winds. She does not have fences protecting from the side of the weather. But such arbors are very good in sunny and just warm weather, nothing will stop you from enjoying the scenery and listening to the twittering of birds.
This gazebo is already a more complex structure, which has side walls - in fact, it is a light house in the garden. The undoubted advantage of such a structure is that you can spend time in the gazebo in any weather, from early spring to late autumn. If your site is located in a climatic zone with a small summer period, or is subject to strong winds, then no doubt, choose this design. Also, there is a combined type of arbors - when the side walls are made removable or sliding. Then, in bad weather or in early spring, when it is still cool, these walls create protection against wind and cold, and in hot summer they can simply be removed before the fall.
Material for gazebo
Pergolas also vary in the type of material from which they are built. It can be:
wooden arbors: from a bar, from a rounded log, from boards,
brick or concrete gazebos: when supporting pillars are laid out of brick or concrete pillars are poured, which can later be covered with stones, bricks or finished with plaster or artificial stone,
arbors based on a metal frame - when metal is used as supporting elements, and even a wide variety of materials can be used in finishes.
The shape of the gazebo can be very diverse. The simplest and most common form is a rectangular arbor. Also, hexagonal and octagonal arbors are often found, as well as arbors in the G and T-shape. Please note that the more complex the arbor shape you choose, the more material and experience you will need to build it.
Pergolas with and without barbecue
A barbecue, or a garden fireplace, or a grill or a garden stove can be located on your site separately from the rest of the buildings, but it is quite convenient to design them together with a gazebo and place a barbecue directly inside.
Why is this convenient? First of all, the fact that the owners have at hand all the tools for cooking the grill and do not need to leave chatting guests for a long time, feeling lonely. Moreover, the grill, which is under the roof, will allow you to cook in any weather, nothing will violate your plans for lunch or dinner.
Garden Arbor Size
Of course, first of all, the size of the gazebo depends on the size of your site. You must admit that the huge building that occupies most of the small garden will look ridiculous. On the other hand, you need to take into account that large companies gather in the gazebo and there should be enough free space for everyone. The size of the gazebo is considered to be optimal 3x5 meters, and if space allows you, then 4x6 meters, for the gazebo with a barbecue. Such a size will allow you to set a table of sufficient size and there will be passages from the back. This is important for large companies, when due to lack of space for someone to leave the table, it is necessary to get up to five others and skip it. Agree, this is inconvenient.
Arbor location on the site
The gazebo should be in a convenient place, close to the kitchen, protected from the wind. If you do not have an area for cooking in the gazebo, this rule is very important - after all, you will have to go to the house for each plate. Consider the view from the gazebo. Well, if it is a pond and a garden, and not the house of neighbors.
It is very important to provide 2 lighting circuits. The first circuit is the upper, bright light. It is simply necessary for table setting, cooking and when cleaning the gazebo. Both fluorescent lamps and bright lights can be used. The second circuit is an intimate, dim lighting. This role can be played by hanging lamps between poles or stationary lamps with dim light. Also, lamps with candles inside look very impressive. Only you need to take care that the candles do not stand in the open and do not cause a fire.
It would seem that this is a completely unnecessary element, especially in the summer. Indeed, in summer it’s so warm. But in spring and autumn, the evening code is cold, an additional source of heat does not fit. The best solution for gazebos is infrared heaters, which do not heat the air, but heat people and objects. Also, for indoor gazebos, a garden fireplace can be used as a heat source.
As already mentioned above, the presence of an economic zone is very desirable in the gazebo. If the size of the arbor does not allow you to build a full-fledged zone for cooking, then at least a cupboard should be put up. It is also good if you have water in the gazebo or nearby. Of course, an indispensable attribute of any gazebo is a large and comfortable table. It is advisable to choose a table in size so that it accommodates the largest number of guests. Choose chairs or benches with backs, as comfortable as possible so that long gatherings do not end with a sore back. If you have an open gazebo, you should still provide at least curtains from the wind - they can be made of dense polyethylene or vinyl, as well as tarpaulin or any waterproof fabric. And now, when you know almost everything, you can start planning your gazebo and purchase building materials!
Bottom harness
On top of the foundation is laid the lower harness, which is a block of wood fastened together. The timber is fastened to each other “in the floor of the tree”. The compound must first be treated with an antiseptic or bitumen. Four screws are screwed on top of the joints for reliability.
In addition to four beams along the perimeter, one additional center is installed - the so-called “log”. In the future, it will be needed to fasten the floorboard to the harness (more on this in the chapter on the floor).
Pillars and top rail
Pillars are installed on the lower harness, which will serve as the basis for the walls and the upper harness. Four pillars are installed at the corners of the gazebo, and one additional column is installed next to the entrance to the height of the railing.
The height of the front pillars - 230 cm, the height of the rear - 200 cm. This is done for the further construction of the roof slope.
The upper harness consists of two beams, installed parallel to each other over the posts. The fastening is identical to the lower harness - to the floor of the tree.
Roofing and roofing
The whole process will be more clearly described in the form of a phased approach:
- On top of the lower trim we fasten 9 rafters with a step of 30 cm,
- In parallel to the rafters, we install 9 boards with a step of 30 cm,
- If you did everything exactly according to the instructions, then you should get a roof in the form of gratings,
- On top of the roof we lay sheets of ondulin or corrugated board, depending on your capabilities.
The rafters are attached to the harness on metal corners and screws. It turns out quite a reliable design that can withstand not only the roof, but also winter snow.
After installing the pillars, you can deal with laying the floor. You will need about 30 boards 3 meters long, some of which will need to be adjusted to fit the pillars. The floor is mounted on screws to the lower harness and the lag in the center.
The secret of the even floor is to level the first board. If you succeed, then the process will go more fun.
OSB handrail and paneling
For the railing, a beam with a section of 50 by 50 mm is used, which is mounted at a height convenient for people. In addition to the beam, it will be necessary to install additional supports, on which the oriented strand board will be fixed in the future. All this is clearly shown in the photographs, which will be presented below.
The OSB plate is mounted on self-tapping screws, plus it is additionally pressed down by bars in the center. This creates not only reliability, but also additional aesthetics.
A few words about antiseptics and paint
The proposed version of an inexpensive gazebo turned out to be extremely beautiful and spectacular. The main secret is a well-chosen color, which in contrast plays between the dark and light shade of the tree.
You can use your tree protection options, but the owner of this building recommends antiseptic Senezh Ultrawhich is applied in three layers. This will allow you to achieve reliable wood protection and beautiful appearance.
Video
I express my deep gratitude for the video presented to the user of the channel titled "Vasya Vasin". It was he who prepared this video on construction, and also commented on some questions that he was asked in the comments.
If you have any questions, then you can ask them both in the comments to his video, and in our stream after publication. We can pass on your questions to him, and then receive and write you his answer.
Photos of summer gazebos
In one of the publications on our website, we examined in detail the variety of summer arbors made not only from wood, but also from other building materials.
You can look at options with different types and designs, as well as pick up any idea for your summer cottage using the link below.
Other construction options
For various reasons, not everyone will find this construction option suitable. In view of this, I offer you construction instructions similar in writing style, in which the process of erecting a gazebo with your own hands is also clearly and clearly chewed.
A few links are provided below.
Among the options presented, all buildings are made of wood and in a fairly budget format. Any elite building materials such as decorative plaster or wild stone are not used here.
Planning and designing
DIY construction of gazebos requires prior planning. So, the decision to build has been made, the beginning has been made. What's next? Then we go forward, weighing and calculating each step. The first step is planning.
Looking around your personal plot, first of all, we should decide on a place where you can build a gazebo. Not many owners of private houses can boast of a large area of land, but we don’t have to build an airplane hangar - we just need to build a gazebo in the country.
On small plots of land it is not always possible to quickly build a gazebo where you want. In most cases, they build where there is a place for building. Do not worry, for the gazebo the main thing is comfort and friendly company, and the “view from the window” is not so important.
Have you decided on a place? Then the next step is to draft. The project for the construction of arbors, like any other building, must include:
- Appearance (exterior),
- Building plan
- Dimensions of all elements of the construction of the gazebo,
- Type, quantity and quality of building material.
Calculate the project of building a gazebo under the force of anyone who has a concept about the vertical and horizontal, about the tool and its use. Given that you were originally motivated to do independent construction, be sure that the stronger the motivation, the better the project.
The zealous landlord will begin the preparation of the project “Arbor at the cottage with his own hands” by counting the remains of bricks, metal pipes, wooden battens neatly stored in the backyards. Based on the amount of a building material, we draw up a construction plan for the gazebo.
If you do not have anything that can serve as building material for the gazebo, it does not matter - it is morally and technically easier to build from scratch. Decide on the design of the gazebo - metal, wooden, brick or combined - and purchase the necessary.
Build a building plan based on the expected appearance of the gazebo. What plan to make is an individual matter. Someone needs a drawing with the exact dimensions in millimeters, someone needs a piece of paper with a pencil drawing.
We want to immediately warn that during the construction process you will have to replay the dimensions more than once, even if not globally, but minor inconsistencies will be necessary.
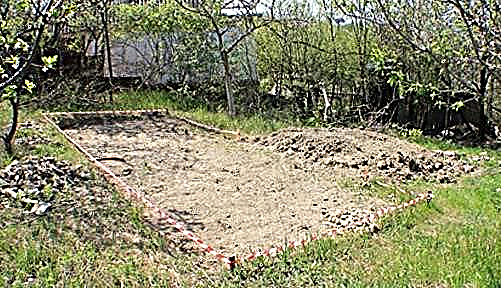
Marking the base of the rectangular arbor
The main thing in the markup is to withstand angles and dimensions. If the design of the gazebo involves the shape of a rectangle or square, then a prerequisite for construction is to withstand right angles (90 °) of the base. Otherwise, with the installation of the roof, an additional waste of time and money awaits you, and the appearance of such a structure leaves much to be desired.
- At one of the corners of the alleged base, we hammer in the “starting” peg No. 1 - a wooden one or a piece of reinforcement, as you like.
- From the starting peg we measure the width of the base, hammer another peg No. 2.
- Similarly, fix the size of the length of the base (peg No. 3)
- We set a straight (90 °) angle according to the formula width² + length² = diagonal² (distance between pegs No. 2 and No. 3).
- From the peg No. 3 we beat off the width, from No. 2 - the length, put the peg No. 4.
- Check the diagonals - their size must match.
The second version of the markup: formula 3: 4: 5. For example:
- We pull the cord along the pegs along the perimeter along the pegs clogged with the supposed corners.
- Define any of the pegs, which is convenient, starting point.
- Point A: from the starting point on the width, lay 3 parts, for example, at 0.8 m - 3 x 0.8 = 2.4 m.
- Point B: from the starting point on the length, lay 4 parts of the same size - 4 x 0.8 = 3.2 m.
- We measure the distance between points A and B. It should be 4 m. (0.8 m. X 5 = 4 m.).
- If necessary, move the pegs to achieve the desired result.
For those who do not like math puzzles, there is the following way of marking, time-consuming, but also effective:
- We hammer all four pegs in the corners, observing the dimensions of the sides of the base.
- We measure both diagonals.
- Using trial and error, we move the pegs until both diagonals become the same size, while maintaining the dimensions of length and width.
Polygon Marking
Many people prefer to gather at a round table, therefore, the design of the gazebo involves a rounded or multifaceted architectural form. If there are two pieces of reinforcement and a cord, marking the base will not be difficult:
- In the center of the proposed base we set the axis (hammer the peg).
- At one end of the cord we fasten a piece of reinforcement, at the other end we make a loop and put it on the axis.
- The resulting "compass" draw a circle in the given sizes. We get a marking line under the round base.
- For a polygonal warping device, it is enough to divide the circle line into the required number of parts and connect the points to each other.
Arbor foundation device
The construction of the gazebo should be treated as the construction of a capital house - with feeling, with sense, with the arrangement.
Just as in the operation of any building, the foundation plays a major role in the quality characteristics of the construction of the gazebo. Depending on the massive structure and soil quality, the following types of foundations are used in the gazebo device:
- Strip foundation - reinforced monolithic or precast concrete belt passing along the perimeter under all walls of the building. The strip foundation is set in calm soil with low groundwater.
The prefabricated type of strip foundations in the construction of arbors is almost never used - the high cost of elements (reinforced concrete blocks), the need to use lifting equipment during installation, the bulkiness of the structure.
If the farm has reinforced concrete elements - reinforced window or door lintels, railway sleepers, old electrical supports (poles) - it is possible to assemble a prefabricated strip foundation with your own hands.
- We dig a trench of the necessary width. The depth of the trench - the height of the lintel while lying + 20-30 cm.
- We lay a sand pillow 10-15 cm. We spill it with water, ram.
- We fall asleep a layer of crushed stone of any fraction. Ramming
- We knock down the concrete along the edges of the lintels, release 5-10 cm of reinforcement.
- We lay the elements on the rubble pillow according to the markup.
- We weld the elements together.
- We close the space between the jumpers with concrete, it is possible with cement mortar.
A monolithic strip foundation under the arbor is arranged as follows:
- Digging a trench. Depending on the massiveness of the structure, the depth of the trench is from 50 to 80 cm.
- On a preformed sand cushion 10-15 cm thick, lay a layer of concrete, approximately 10 cm.
- We lay roofing material on the concrete layer or treat the surface with bituminous coating waterproofing.
- We arrange the frame from the reinforcement. For the arrangement of the foundation of the gazebo, four working rods of reinforcement with a diameter of 10-12 mm are enough. The rods are welded together by jumpers from segments of distribution, finer reinforcement. The cross-section of the frame is a square. To save, it is possible to use waste from working fittings.
- We lay the frame on the concrete layer in the trench, we connect (weld or twist) all the spans and corners.
- We mount the formwork, trying to adhere to the layout.
- Knead the concrete and pour it into the formwork. The small size of the base of the gazebo allows you to withstand the technology - fill the foundation in one sitting. If opportunities do not allow (there is no time, adverse weather, there is not enough formwork for the entire perimeter), it is advisable to pour concrete immediately, at least on one wall from corner to corner, to the entire planned height.
- After the concrete has hardened, we remove the formwork, waterproof the foundation and do backfill (we fill the ground with unfilled concrete).
The reinforced strip foundation is usually arranged under heavy brick and stone arbors. Along with this type of foundation, when building massive objects on problematic soils, it is possible to use a slab foundation.
- Slab foundation It is a monolithic reinforced slab, which is located under the entire building. The foundation of this type is indispensable on moving, hazardous soils with a high level of groundwater. Another “plus” of this foundation is that the foundation slab simultaneously serves as the floor of the room. If you are planning a major concrete floor in the gazebo, we recommend “kill two birds with one stone” - to build a slab foundation.
- Pile foundation - An ideal foundation for arbors of lightweight construction - wooden and metal. The construction and technology of the pile foundation device embody the basic wishes of the individual builder - minimum investment, minimum effort and maximum “exhaust”. The foundation of this type is suitable for any soil, both calm and floating.
The construction of the pile foundation is fundamentally different from the usual continuous monolithic tape - the base of the gazebo, depending on the design, relies on a certain number of pillars - concrete, wood or metal - vertically extending into the ground.
Consider the process of building a pile foundation:
- On the line of marking the perimeter of the building with a drill - manual or mechanical - we make wells. A well with a depth of 1 m and a diameter of 20-30 cm is enough to build the foundation for the gazebo. We count the number of piles, focusing on the area of the building - usually through a meter around the perimeter and 1-2 in the center.
- In the well we lower the rolled roofing material, we make a kind of formwork. Formwork has two functions - it does not allow the cement “milk” to soak into the soil when pouring concrete, preventing the concrete from losing strength, and serves as a waterproofing.
- In the formwork we lower the reinforcement, 3-4 rods, to the very bottom of the well. The upper part of the working rods of the reinforcement should protrude 25-30 cm above the soil level.
- We arrange the outer formwork around the protruding reinforcement. The top of the formwork above all the wells is desirable to immediately set to one level horizontally.
- Knead the concrete mixture in a ratio of 1: 2.5: 5 (1 part cement M-400 + 2.5 parts sand of a large fraction + 5 parts of crushed stone of medium or small fraction).
- Carefully pour concrete into the well, periodically seating it with a reinforcing bar.
Another version of the device piles - concrete is poured to ground level, and the top is laid out with brick, columns. To implement this engineering idea, it is advisable to use a red, burnt brick.
Arbor frame mounting
Regardless of the size of the arbors and the material used for their construction, the installation of the frame is fundamentally the same and consists of the following steps:
- Installation of vertical racks (supports) of the frame,
- Bottom harness device,
- The device of the upper harness.
The second name of the vertical stand - the support - speaks for itself, on it and on a number of the same supports provided by the project, the roof rests and the connecting structural elements are attached. The installation of uprights should be taken very seriously, however, as with the rest of the construction phases of the gazebo.
In the gazebo frame device, two options for installing support posts are used:
- installation of racks directly into the foundation,
- fastening the supports to the crown of the lower harness.
The installation technology of metal and wooden racks is slightly different, although in general the technology is the same.
Installation of vertical supports for the gazebo
When planning a pile foundation for an arbor, pay attention to the fact that you can save a lot by installing a support directly in the well.
When constructing a metal gazebo with your own hands, for vertical uprights, a profile pipe of square section 50 x 50 mm., With a wall thickness of 2 mm or more, is usually used. The height of the supports is individually designed. When preparing material for uprights, make an allowance for the part of the support to fall below the zero mark (level of the finishing floor) by 50 cm.
- Before installing the rack on the bottom of the pipe, we apply bitumen waterproofing. We process the part that will be in concrete.
- We lower the support into the well, orient it in height and vertical, fix it.
- Pour concrete to the required level.
In this way, angular supports are installed. Mortgages are placed in the intermediate, passing along the perimeter, wells - the lower harness will be welded to them.
In the construction of arbors made of wood, this method of installing supports is also acceptable. For a small gazebo with a lightweight design, supports from a bar measuring 10 x 10 cm are enough.
- On the edge of the wooden rack we fasten, preferably with bolts, a metal corner 70 cm long (50 cm in concrete and 20 cm in the overlap of the rack).
- We process a corner with bituminous waterproofing
The further process is no different from the installation of a metal support - we lower it into the well, orient in space, fill it with concrete.
There is another option for installing supports, in which vertical racks are attached to the lower crown of the harness.
Arbor strapping device
The harness, both lower and upper, connects all the vertical posts, fastens the structure. For metal strapping, a profile pipe of the same size as on the racks is used.
- We arrange the lower crown (harness) - we connect the racks to each other with a profiled pipe of the required size,
- We mount the upper harness, connecting the racks along the top,
- We make an intermediate harness at a height of 80-90 cm. The height is given roughly - depends on the planned height of the walls of the gazebo.
For the strapping device, you can use reinforcement, a rod, a corner and a pipe of any diameter, provided that this does not affect the quality and integrity of the structure.
The frame of the gazebo from the beam with your own hands is performed somewhat differently:
- We lay out the wooden beam on the foundation and fasten it in the corners, we get the lower crown.
- We fasten the crown to the foundation. For fastening we use anchor bolts. If the foundation is tape, then the mounting step is arbitrary - the main thing is to keep it tight. When strapping on a pile foundation, we fasten the crown in piles. If it is necessary to align the crown horizontally, we use linings from linoleum - in addition to alignment, it also performs the function of waterproofing between a wooden beam and a concrete foundation.
- We install the racks in the corners strictly vertically and fasten to the crown. You can connect the racks to the strapping beam with a lock connection, but it is better for a lay person to use a metal corner.
- If the project provides for additional racks, we mount them in the same way as angular.
- We arrange the upper harness in the same way as the lower one.
To strengthen the design, the harness is complemented by transverse or diagonal jumpers.
Arbor roofing device
Depending on the design, the roof of the gazebo can be single-pitch, gable or multi-pitch. In this article, we analyze the construction of a gazebo with our own hands, so we will focus on a shed roof, as on the simplest and cheapest option.
- On the upper rim around the perimeter we fix the Mauerlat - a stable structure that serves as a support for the rafters. The function of Mauerlat is to evenly distribute the weight of the roof on the structure and firmly bond the roof to the walls
- On the Mauerlat we lay out the beams in the "on the edge" position. Beams on the small and lightweight roof of the gazebo are made of timber 50 x 100 mm. If the length of the beams according to the project exceeds 3 m., Then they are made of timber 50 x 150 mm. The ends of the beams should not protrude beyond the plane of the walls. The number of beams depends on the size of the building. In any case, the distance between them should not exceed 1 meter.
- We install short vertical posts on the edges of the beams. If we consider the device of a single-pitched roof of a small arbor, the slope can be from 10 to 25 degrees. All racks must be mounted in the same plane, and be the same in height. You can do without the device of individual racks, if you first make one wall above the opposite. In this case, the rafters can be arranged directly on the upper harness, having previously strengthened it with a Mauerlat.
- We are preparing rafters with the expectation of two eaves overhangs - back and front.
- We install the rafters.
- We build a crate. The crate can be made from a rail or unedged board. Recently, a continuous crate of OSB-boards or moisture-proof plywood is widespread. A continuous crate is arranged under a flexible coating, bitumen tile.
An example of a pitched roof device for a wooden gazebo was given. The device of a shed roof made of metal differs only in the material and method of fastening (self-tapping screws, anchor for wood, welding - for metal). The lath is attached directly to the rafters from profile pipes.
With a wealth of choice of modern roofing materials, there are no problems with overlapping the small gable roof of the gazebo - it is only a matter of personal attachments and means. Based on the fact that in our example a continuous lathing is arranged on the roof, any roofing material can be used as a coating - from a soft roof to a metal tile.
Arbor flooring
Not every material is suitable for flooring in open arbors. The flooring must have a strong resistance to temperature extremes, moisture, and insects. For each type of gazebo, it is worth choosing a floor that will organically fit into the design.
For a wooden gazebo, for example, you can make the floor from wooden boards or wood-polymer. In brick and stone arbors the floor from ceramic or paving slabs will organically look.
Before you make a gazebo made of wood or metal, consider the floor coverings common in the construction of a gazebo with your own hands:
Wooden floor is the most common, beautiful and environmentally friendly. For the device of a wooden floor, different types of hardwood and coniferous boards are used.
- On the lower crown we fasten the logs of a wooden beam. The size of the distance between the lags depends on the thickness of the flooring boards: the thicker the board, the greater the distance. Logs are attached to the harness with anchor bolts or using a metal corner.
- Directly lay the floor boards on the logs, and then fasten them. We make the floor, which will be influenced by atmospheric factors, swell and dry up, so we do not fit the boards tightly, we leave a gap between them of 2-3 mm.
- All wooden elements - logs and boards - are treated with antiseptics. You can use drying oil - an old, but effective way.
The wooden floor, although beautiful, is not durable in the open air. A simple wooden board was replaced by new modern finishing materials:
- The terrace board is made of hardwood in the southern regions. It has high wear resistance and moisture resistance. High price is the only negative.
- Deck board differs from terrace only in surface structure. The deck board has a matte corrugated surface, and the deck board is smooth. The composition of the deck and terrace boards includes crushed wood with polymer additives to ensure its properties.
- Decking (garden parquet). A distinctive feature of this coating is that it can be disassembled at the end of the season, and reassembled in the spring. For the device of this floor, you only need to level the base.
Natural wood compares favorably with polymer floor coverings, but loses in quality of operation.
Concrete floor - It is used mainly in massive brick or stone structures. For those who plan to make a concrete floor, we advise you to opt for a slab foundation. Thus, you get “two in one” - a strong foundation and floor at the same time.
Concrete floor can be improved with ceramic tiles. In this case, use monolithic ceramic tiles (granite) or special - for outdoor use. Do not use ordinary glazed ceramics - enamel exfoliation is possible from temperature changes.
Paving floor - Ideal for metal gazebos, in the construction of which the vertical supports are fixed directly to the pile foundation.
The device of the floor from paving slabs is not difficult:
- We install the formwork around the perimeter - we need to raise the floor level to a small height, sufficient so that rain water does not flow into the arbor. Formwork can be arranged from pavement curbs - the edges of the floor will be securely fixed.
- We lay a pillow of crushed stone 5-10 cm over the entire area of the future floor.
- We arrange another layer of dry cement-sand mixture.
- We lay paving slabs. It is advisable to lay a couple of rows around the perimeter on a cement mortar prepared in a ratio of 1: 3 (1 part of cement + 3 parts of sand). This method will protect the floor from "sprawling" under the influence of rainwater.
Interior and exterior decoration of the gazebo
What about the finish? Then there is someone in what much. The gazebo can be made completely closed, but did you really achieve this? The gazebo, by its nature, is an open type design, designed for a pleasant pastime in the warm season - and we will not change traditions. The "classic" options for finishing arbors can be considered a lattice of wooden slats and a hedge.
The lattice perfectly obscures and does not impede fresh air, and climbing plants (grapes, ivy, etc.) create an atmosphere of calm and balance, originally inherent in all living things.
We hope that after reading the article, you understand the main stages of the construction of the gazebo, learn about the properties of the necessary materials, as well as about their application. In a word, we learned how to build a gazebo. Make a project and go for it. Good luck
We build a gazebo with our own hands - practical recommendations
In the summer at the dacha in the house is hot. It's good to drink something cool in the gazebo. Yes, a gazebo is needed. We decide on the place where she will stand: quiet, away from home and from the road. How many people can be placed in it, what form to choose? And there are many of them: round, rectangular, angular, square. But there is a common thing for all arbors: this is not a capital structure. It should be light, airy, transparent. And the roof performs 2 functions: it shelters from rain and sun. Choose a square shape. Size 3 x 3, height 2.7 m. What material to choose? Best of all is a tree. Why? Because you can do all the work yourself, and the toolbox will be minimal. Construction begins with the foundation, even if it is a light wooden arbor. She needs a columnar foundation. It is easy to build with your own hands.
So that moisture does not accumulate under the arbor, the fertile top layer must be removed. We clear the area and outline the outline of our gazebo. The pillars of the foundation must be immersed to the depth of freezing. Our pillars will be of wood. They need to be treated with an antiseptic, then they will stand up to 15 years. For the foundation to stand straight, the installation of poles must be checked by level.
For waterproofing, lay a layer of roofing material. To base the gazebo, we take a bar 100 x 100 and lay it on the prepared poles. And on top you need to make cuts for fastening.
We prepare the base of the roof on the ground. In the middle part we connect the boards, and then this place for strength additionally needs to be strengthened. We make cuts along the edges of the boards, then the base of the roof will pass into the vertical posts that are already prepared. The base of the roof is raised to the desired height and secured.
Then we collect the roof itself on the ground and connect it to the base, inside we clad it with lining. Arbor frame ready. Cover the roof with whatever you want. Avoid slate, they usually cover sheds. The floor can be made of timber or paving slabs. Walls can be made solid or trellised.
Metal
Pergolas with a metal frame are easy to assemble and highly durable. The frame can be sheathed with lining, polycarbonate, corrugated board, or forged gratings can be installed around the perimeter. For the manufacture of the frame, profile pipes with a wall thickness of 2 mm or more are usually used. Designs are divided into collapsible and welded, depending on the installation method. In collapsible gazebos, the elements are bolted, such frames when cold weather occurs, you can easily disassemble and store in a dry room until spring.
 Arbor garden metal folding
Installation of the welded frame is much faster and requires less effort: the transverse trim and the roof frame are simply welded to the supporting racks. The disadvantage of metal arbors is their susceptibility to corrosion, therefore, each structural element must be primed and painted.
Brick
The arbors laid out from a brick look solid and very attractive, practically do not demand leaving, are very durable. Structures made of decorative bricks entwined with climbing plants look especially stylish. Such arbors can be open and closed, round, square, hexagonal. Since brick is a non-combustible material, it is in such designs that built-in barbecues and barbecue stoves are made.
 Brick gazebos
Wooden
Wooden arbors are probably the most popular. For the construction they use timber, logs, boards, chipboard and plywood, even durable rods. The technology for assembling a wooden frame is quite simple and understandable, so anyone can do it. For wooden elements, antiseptic primer mixes and a protective coating in the form of varnish or paint are required. It is additionally recommended to use flame retardants, especially if the barbecue is located nearby.
Combined
The combination of various materials during the construction of the gazebo is also not uncommon. Sometimes this is due to savings: after a major overhaul or construction, there remains a brick, steel pipes, boards, which individually will not be enough for a whole arbor. In other cases, the reason for this decision is the desire to fantasize and create something exclusive, but most often the materials are combined to simplify the construction process.
Other differences between arbors include the shape and type of construction. They are rectangular, hexagonal, octagonal, according to the type are divided into open and closed. The roof of the gazebo is also mounted in various versions: it can be single-pitched, gable, pyramidal or multifaceted.
Construction technology arbor
For example, a 5.4x3 meter construction with a gable roof is used. The construction process consists of the following steps: marking up the site, preparing the foundation, installing load-bearing supports, making piping, assembling and installing the roof, installing the floor, and finishing.
First, prepare everything you need:
- profile pipe 40x40 mm and 40x20 mm,
- electrodes with a cross section of 3 mm,
- welding machine,
- Bulgarian,
- hand drill
- building level,
- roulette,
- bitumen mixture
- primer,
- elbow
- wooden pegs
- sledgehammer,
- concrete, sand and rubble.
Step 1. Markup
The plot reserved for the gazebo is cleared and removed turf. One of the corners of the building is determined, a peg is driven into the ground, then the length and width of the arbor are measured from it, the string is pulled between the pegs. Diagonals are measured in the resulting rectangle - if they are equal, the angles are marked correctly. The width of the rectangle is 3 m, the length is 5.4. The short sides are divided in half and secured by beacons, one of the long sides, which will be the back wall of the gazebo, is divided into three equal sections of 1.8 m each.
 Markup
Step 2. Preparation of pits for poles
In place of the pegs dig holes with a depth of 0.5 m. It is most convenient to use a hand drill, then the soil around the support remains dense and stable. You should get 10 holes with the same depth and diameter.
 Pit for a pillar
Step 3. Installing the supports
A profiled pipe 40x40 mm grinder is cut into 10 parts of 3 meters long. Each rack for a third of the length is coated with liquid bitumen and dried. After this, the pipes are lowered with the machined side into the pits, level and hammered to a depth of 80-90 cm. The verticality is checked again and the holes are poured: first with a layer of sand, and then with a layer of crushed stone. Concrete mortar is poured from above, pierced in several places with a metal rod or a shovel so that excess air comes out, and the surface is leveled.
 Foundation column (roofing material is used instead of bitumen)
Step 4. Installation of the harness
It will take 6 pieces of pipe 40x40 mm 3 m long and 4 pipes 40x20 mm 5.4 m each. The piping should be fixed along the perimeter of the structure at a height of 0.8-0.9 m from the ground and on the upper edge of the bearing supports. Since the supports have the same height, the piping pipes are simply laid on top and welded.To fix the lower harness belt, on one of the posts put a marker on the desired height marker, and then use the level to transfer it to all other racks. After this, the pipes are applied to the marks and welded. At the end, the upper trim is reinforced with two more transverse pipes and proceed to the assembly of the roof.
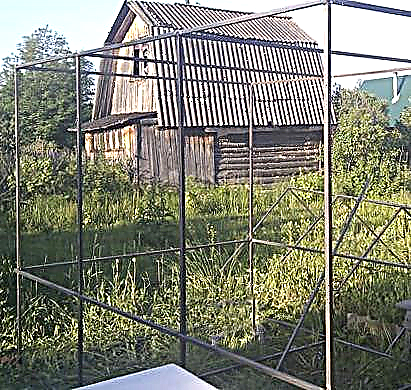 Frame
Frame
Step 5. Making the roof
The roof frame consists of a base, transverse lintels and slopes. For its manufacture, a profile pipe of 20x40 mm is required. The pipe is cut according to measurements: 3 lengths of 5.4 m, 4 lengths of 3 m and 8 lengths of 2 meters. A rectangle is welded to the size of the gazebo, then 2 segments 2 m long are applied at the corners from the short side and connected to each other so that the lower ends protrude 5 cm beyond the edge of the frame. In the same way, the remaining 6 segments are welded and strengthened on the roof frame at regular intervals. On top of the farm reinforce the longitudinal pipe, below - two transverse.
To install the structure on the posts you need an assistant. The roof frame is lifted and carefully placed on top of the harness. After alignment, the frame is welded at the corners and at 4 points around the perimeter of the gazebo. Now you need to clean the weld points, primer and paint the entire structure.
Step 6. Floor device
The floor in the gazebo will be laid with paving tiles. This is the most convenient and easiest option, but you can use others, for example, concrete screed or wooden floor. So, the turf layer was already removed during the marking, so now you need to carefully level and compact the soil. Be sure to check the site level, if necessary, add earth or remove excess. After this, the site is covered with sand or screenings, the layer height should not exceed 10 cm. In this case, it is necessary to make a slope of several degrees, which will not allow rain water to accumulate on the gazebo floor.
 Laying paving slabs
  Laying paving slabs
 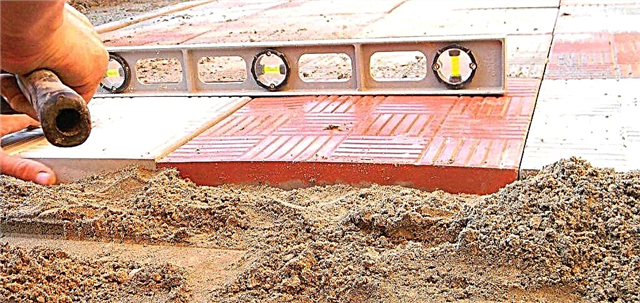 Laying paving slabs in the gazebo
  Laying paving slabs
A groove is dug around the perimeter of the future floor and curbs are installed, then tiles are laid out on the sand, knocked out with a rubber hammer so that the seams are as dense as possible, and checked with a level. When all the fragments are laid, the floor is covered with fine sifted sand and a broom distribute it at the seams. Then the remaining sand is swept away, and the tile is well moistened with water. To do this, it is better to use a spray, since strong jets can wash the sand.
Step 8. Finish
The gazebo can be left completely open, but if you close it on the sides with low walls, it will be much more comfortable. You can fix polycarbonate on the outside, install openwork welded lattices, wooden shields, waterproof plywood between the floor and the harness - all that the imagination prompts. Inside the gazebo, benches and a convenient table are mounted, and if necessary, electricity is supplied.
 The building, covered with thickets of grapes
According to a similar technology, gazebos are built of wood and brick: they mark out the site, install or lay out the support legs, and mount the roof. Only the foundation is different, because for a brick gazebo it is better to fill in a monolithic or strip foundation, and a columnar is more suitable for a wooden one.
 Metal profile pavilion
 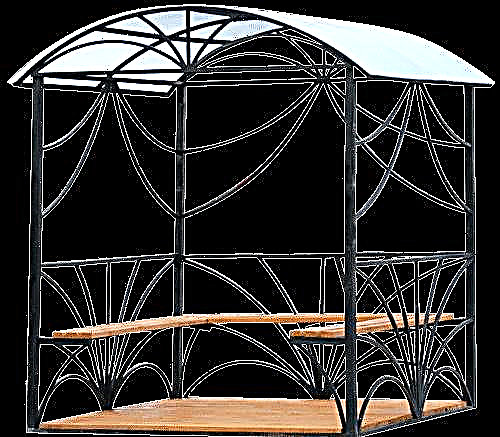 Metal arbor example
How to build a gazebo made of glass with your own hands?
The most important purpose of arbors is a pastime in the nature, on the street, in the fresh air. In warm, good summer weather, it is so pleasant to have breakfast in a beautiful gazebo, watching the surroundings or your kids playing nearby. But in the rain, with a strong wind, and even more so in winter, there is no sense in the gazebo - it will be uncomfortable in it, you will feel all the vagaries of nature. If you do not want to be dependent on weather conditions, it's time to think about a great alternative - glass gazebos are much more comfortable and convenient, moreover, building them is not so difficult.
The base of the arbor made of glass
You can prefer a strip or column foundation for a glass arbor. You should choose one or another option depending on the mass of the proposed structure and on the characteristics of the soil on your site.
Most often, glass arbors are installed on a strip foundation: a monolithic reinforced concrete structure is laid around the perimeter of the entire arbor.
The pillar foundation is a column of concrete, which after a certain period (step) is installed around the perimeter of the gazebo. These posts should be under the crossbeams.
The simplest version of the foundation for a glass gazebo will be the deepening of the supporting racks into the ground.
Glazing systems
Having established the foundation, it's time to think about the glazing system, which at the moment the construction market can offer you:
Cold glazing. This is an ordinary aluminum profile.
Warm glazing. This is an aluminum profile with a thermal insert.
Triplex. This is frameless glazing, that is, instead of profiles, point fasteners are used. In this case, the frame can be built from stainless steel profile pipes (they do not require additional care, aesthetic, have a long service life).
If you are doing not a full-glass, but a glazed arbor, then in this case the frame is made of brick or wood, and the walls are glazed. If you provide the gazebo with powerful load-bearing elements, you can choose almost any type of roof.
For all-glass arbors, a metal frame with a thin overhead system is used as roofing material.
Glass arbor doors
If you decide to glaze the gazebo or build it all-glass, then leaving it without a door (that is, an empty gap) simply does not make sense. So that they do not attract too much attention and do not violate the integrity of the structure, both swing and sliding door structures are recommended. Use silicone seals to prevent drafts.